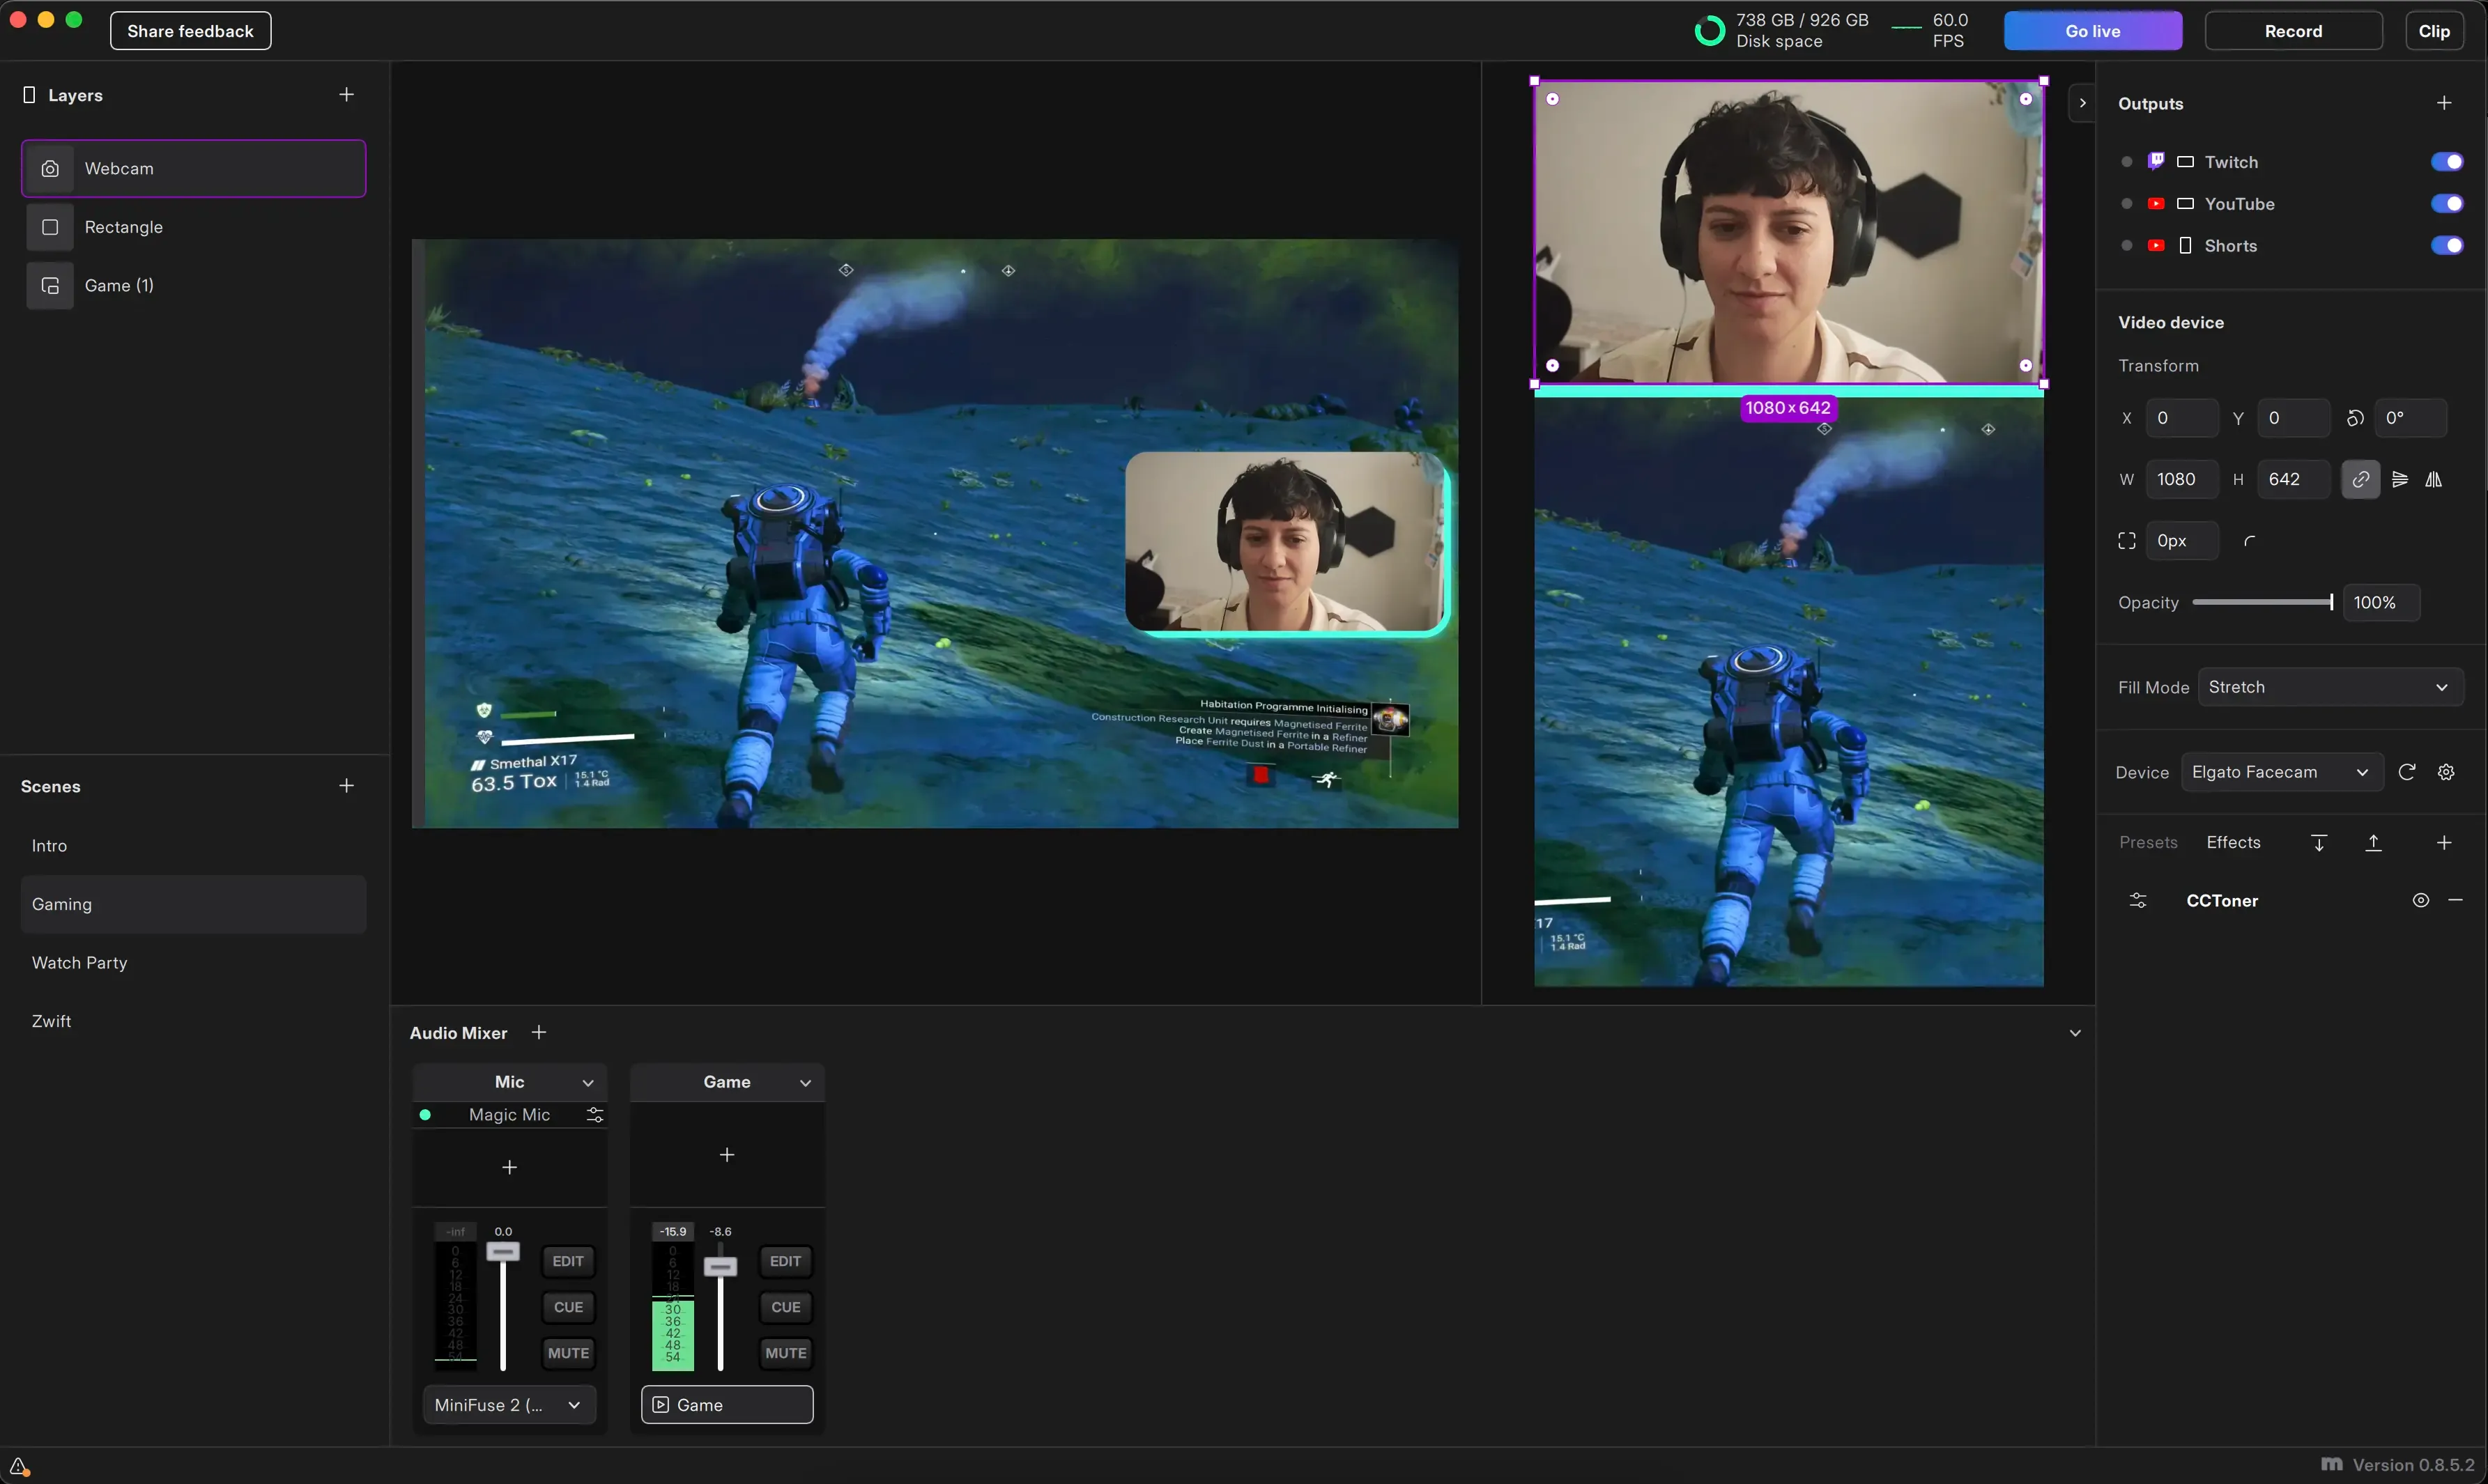
Meld Studio supports live broadcasting to multiple destinations and resolutions, as well as local recording and video clipping. Multi Canvas is supported, enabling simultaneous horizontal and vertical layouts within the same project. Each output can be assigned to either the Main Canvas or the Vertical Canvas.
Supported output types include streaming services, local recordings, video clipping, and the virtual camera.
Multistream
Multi Canvas
Multi Canvas allows each scene in Meld Studio to include two canvases side by side: the Main Canvas, which supports flexible orientations, and the Vertical Canvas, which is locked to a vertical resolution.
How It Works?
- Each scene will have two canvases.
- You can design layers independently on each canvas.
- Switching scenes will change both canvases simultaneously.
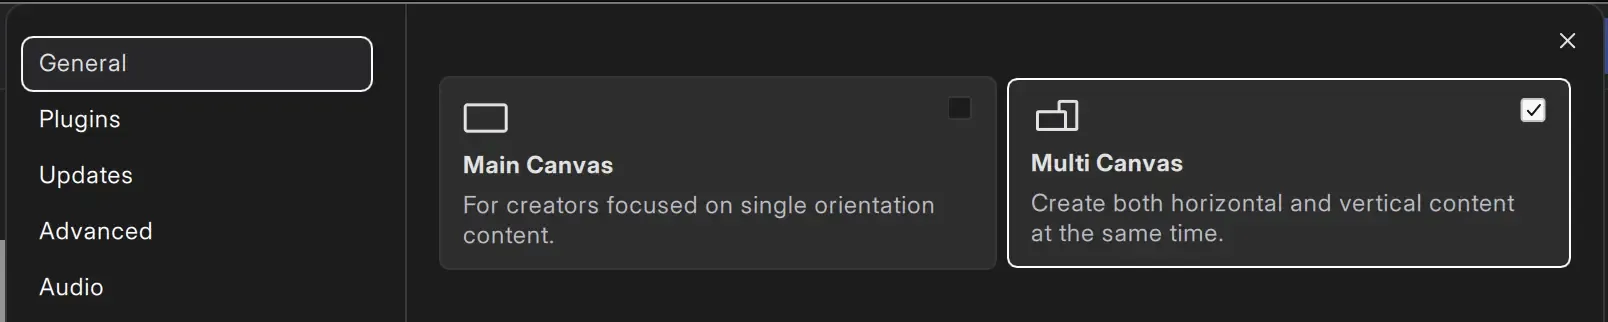
Enabling Multi Canvas
Multi Canvas can be enabled at any time:
- Navigate to
Settings → General. - Select Multi Canvas.
The Vertical canvas will be activated.
Scenes And Layers Behavior
Both canvases share the same set of scenes, but each canvas maintains an independent layer stack.
- Layers can be independently managed per canvas.
- Cross-canvas layer copying is supported (e.g., copying a camera or alert from Main to Vertical).
To keep the same vertical layout across multiple scenes, use the Scene Duplicator layer on the Vertical Canvas.
- Add a Duplicator layer to the Vertical canvas.
- Select the Vertical scene to reference in the Duplicator.
- The Vertical canvas will display the layout from that scene.
- Any changes to the source scene are reflected automatically across all scenes using that duplicated layout.
Color-Coded Layer Selection 🔵🟣
To improve visual clarity while editing, layer outlines are color-coded based on their canvas:
- 🔵 Layers selected on the Main Canvas are outlined in blue.
- 🟣 Layers selected on the Vertical Canvas are outlined in purple.
Active Canvas Indicator
A canvas icon indicates which one is currently active at the top of the Layers panel, next to the panel label.
Canvases Transitions
Global Transition settings apply to the Main Canvas by default. The Vertical Canvas always uses a Cut when switching scenes. This avoids unexpected movement or animation between vertical scenes, which is especially important when a single vertical layout is reused across multiple scenes.
To apply the same transition to both canvases:
- Hold Key: Shift ⇧ and long-click the "m" icon at the bottom of Meld Studio.
This will open the Experimental Features popover. From here:
- Enable the toggle: Vertical Uses Main Transitions.
Once this feature is enabled, the Vertical Canvas will mirror the Main Canvas transition during scene switches.

Output Configuration
Each output in Meld Studio can be independently assigned to one canvas—either the Main or the Vertical Canvas. This applies to:
- Streaming outputs
- Recording output
- Clipping output
- Virtual Camera output
Canvas selection is done within each output settings.
Multiple Outputs
Meld Studio allows you to stream to multiple platforms at the same time, helping you connect with a wider audience. Whether you're streaming on Twitch, YouTube, Kick, Facebook, or other platforms that support RTMP and RTMPS.
To start multistreaming with Meld, go to the Stream settings and add multiple stream outputs. Repeat the steps for adding Outputs, and set up your desired stream destinations.
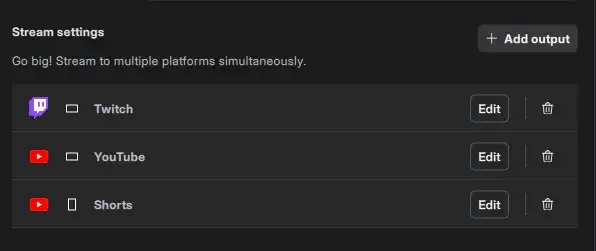
Your outputs will be listed under the Stream settings section in Preferences, and also listed in the Outputs panel in the viewport.
Stream Settings
The Stream Settings section is where you configure your stream outputs, which represent the destinations for your livestream.
Stream Outputs
Get started setting up your livestream Output.
- Navigate to
Preferences → General → Stream settings. - Click the ╋ Add output button to add a stream destination.
- Or click the ╋ icon on the right of the Outputs panel.
When you click to add an output, you'll be prompted with a dialog to select one of the available output options.
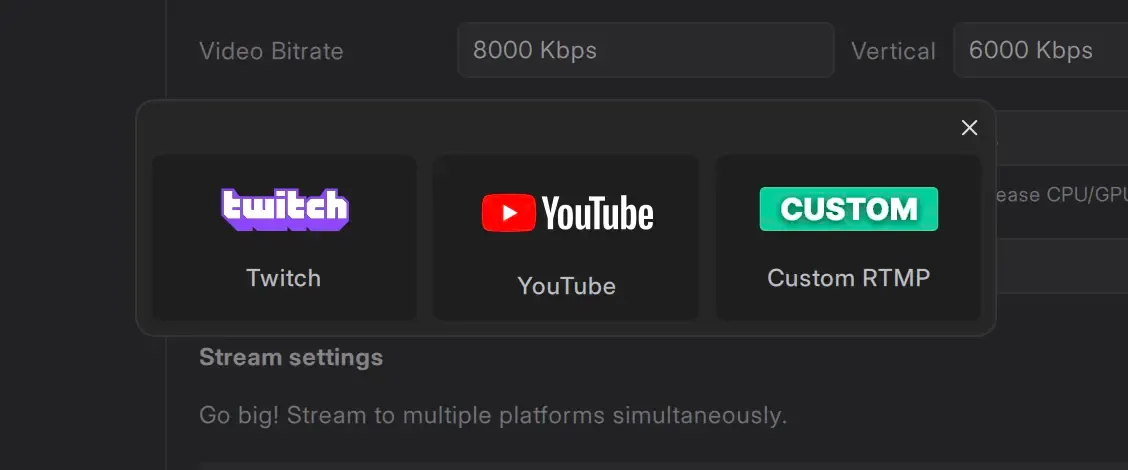
- Choose the output option that fits your content.
- You'll be redirected to the output settings where you can provide the stream information to be able to go live.
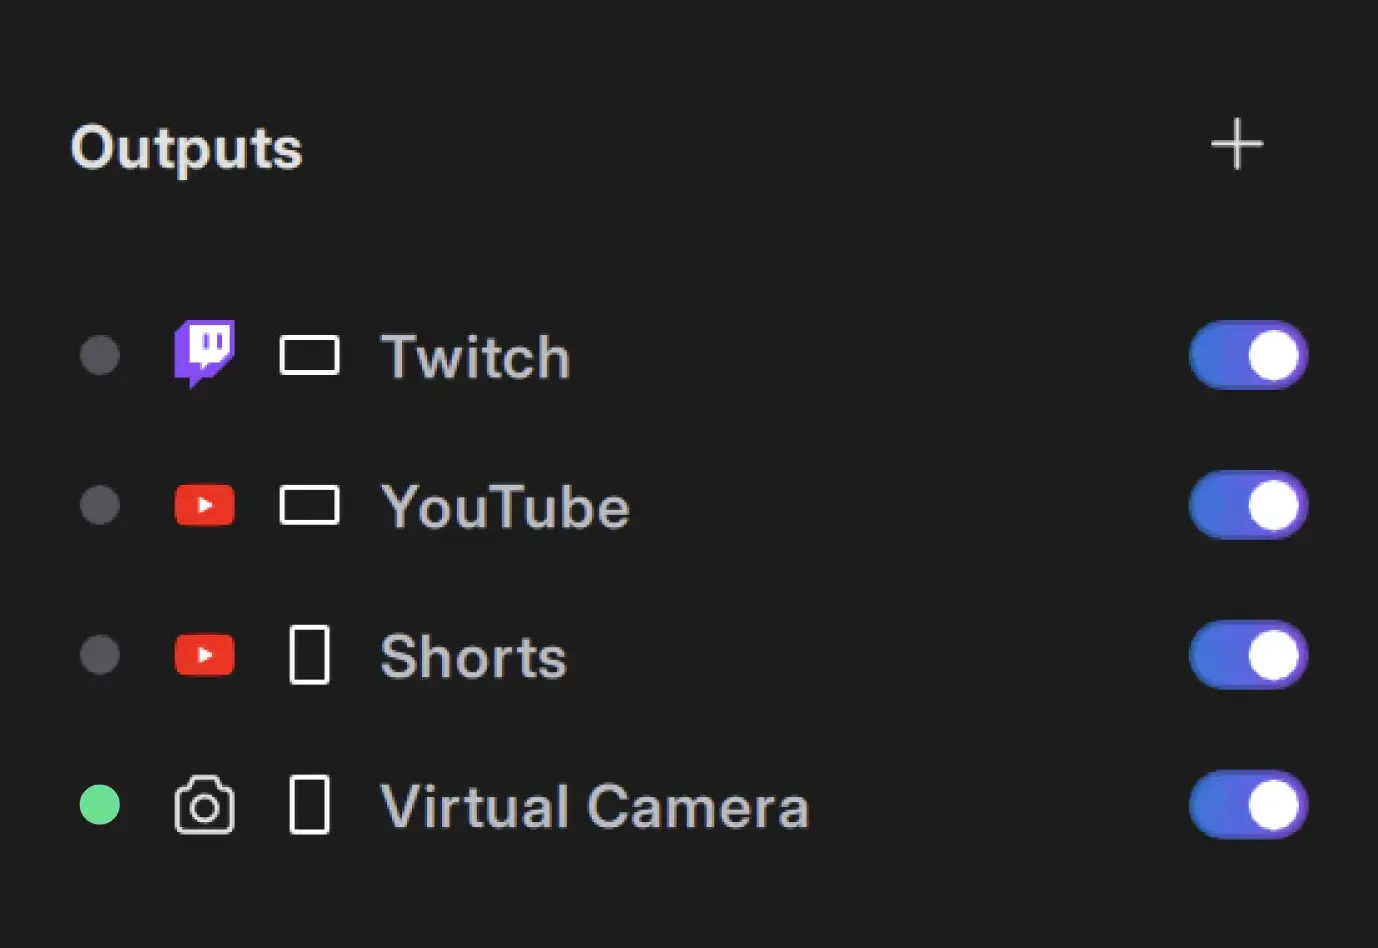
Outputs Panel
The Outputs panel, positioned in the top-right corner of the viewport above the Inspector panel, enables you to easily manage and monitor each stream output.
Meld lets you start or stop individual streams on the fly. This feature provides flexibility and control over your stream outputs.
For example, you can begin streaming on Twitch and later start streaming on YouTube. You can also end a stream on one output while continuing to stay live on others.
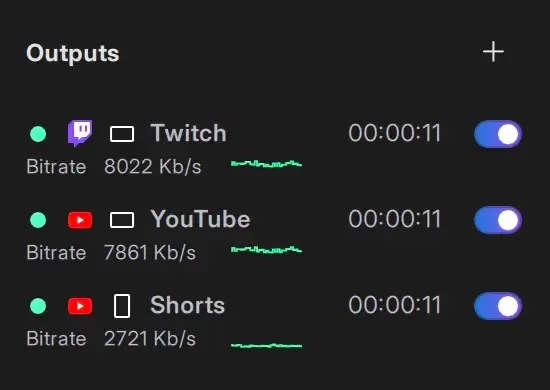
You need to have at least one output enabled to be able to go live.
You can enable and disable outputs by switching the toggle in the outputs panel, or in the Output settings:
Virtual Camera
The Virtual Camera acts as a virtual hardware source that allows you to mirror your scenes in a third-party application, such as Zoom, Google Meets, Discord, and more.
How To Install The Virtual Camera
- Go to Preferences → Virtual Camera.
- Click on the Install button.
- Restart Meld Studio for the changes to take effect.
Once Virtual Camera is installed, and Meld Studio is restarted, the Virtual Camera will appear in the Outputs Panel on the right side of Meld Studio. From there, you can toggle the Virtual Camera on and off as needed.
How To Use The Virtual Camera
- Navigate to the Outputs Panel on the right-hand side of Meld.
- Turn on the Virtual Camera by toggling the switch.
Meld's Virtual Camera will now be available for use in third-party applications or on websites.
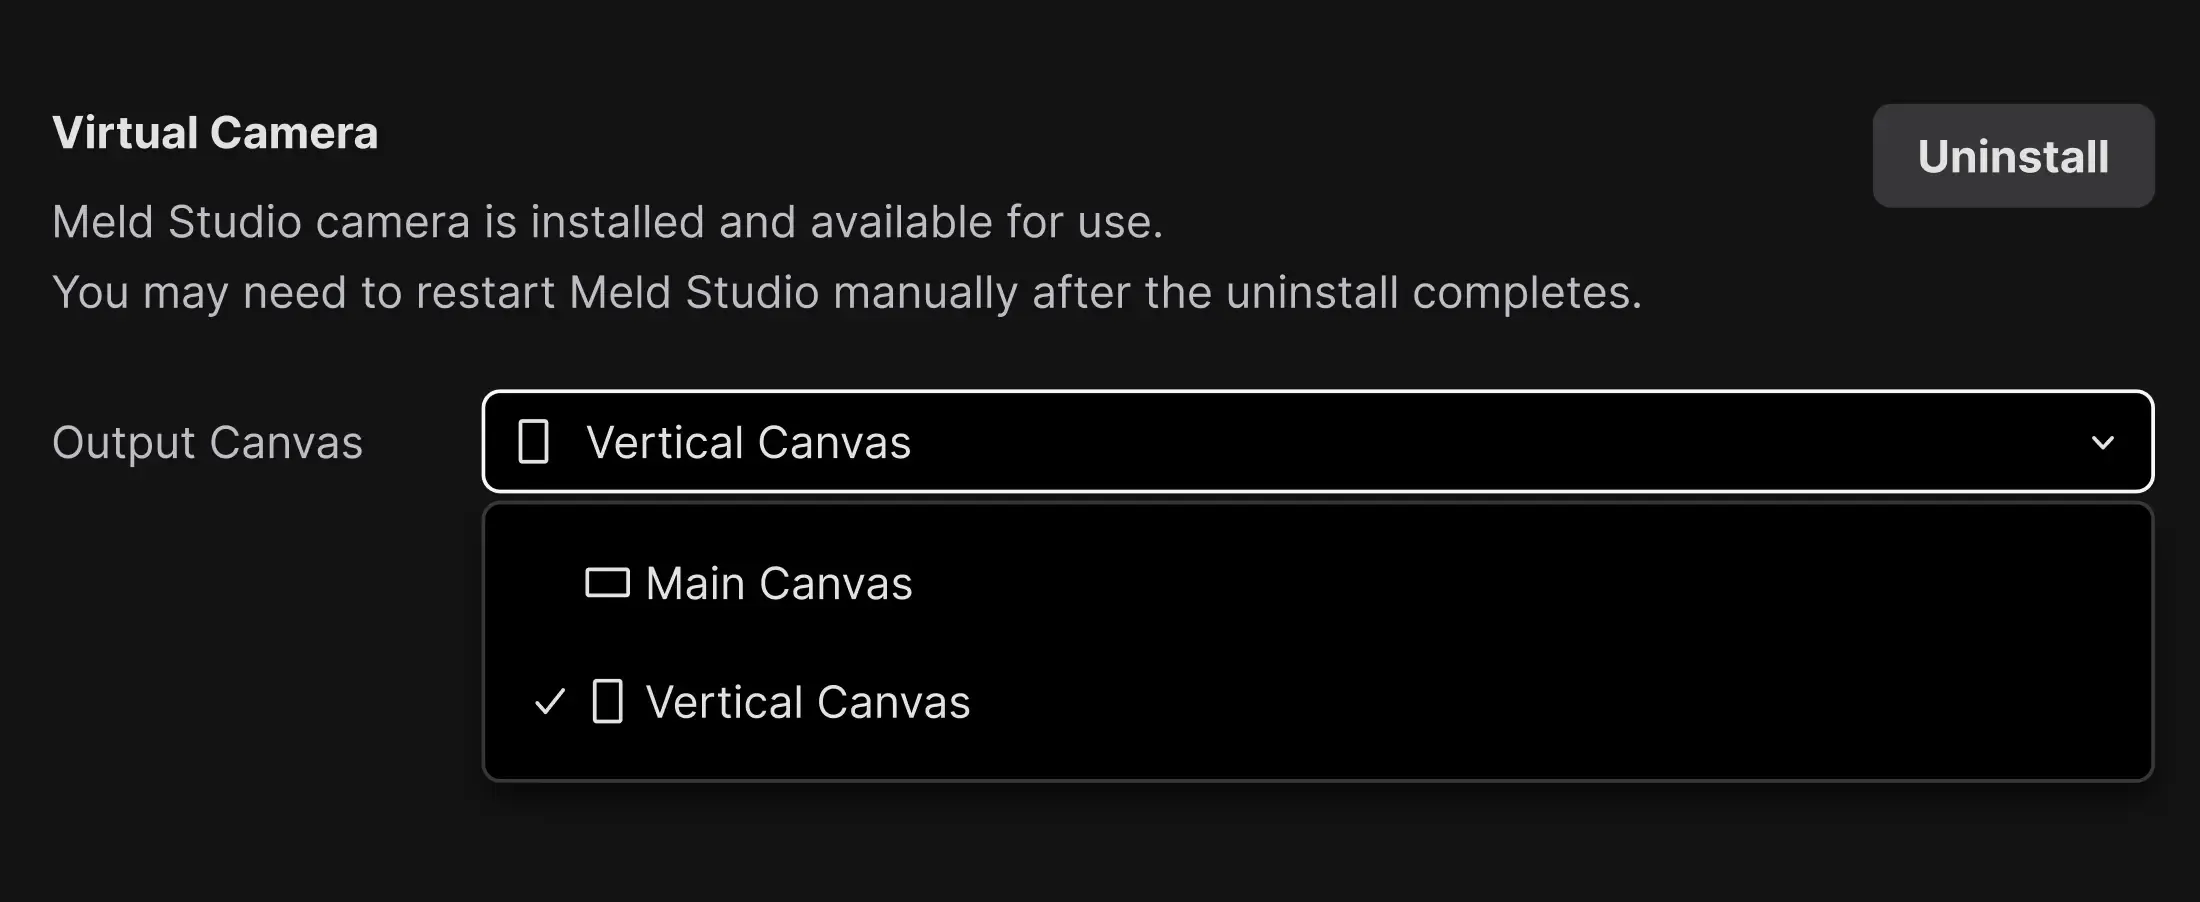
To remove the Virtual Camera from the Outputs, simply uninstall it by navigating to Preferences → Virtual Camera.
Virtual Camera Canvas Output
Choose which canvas (Main or Vertical) is sent through the Virtual Camera. To change the canvas output:
- Navigate to the Virtual Camera tab in Settings.
- Expand the Output Canvas dropdown.
- Select either Main Canvas or Vertical Canvas.
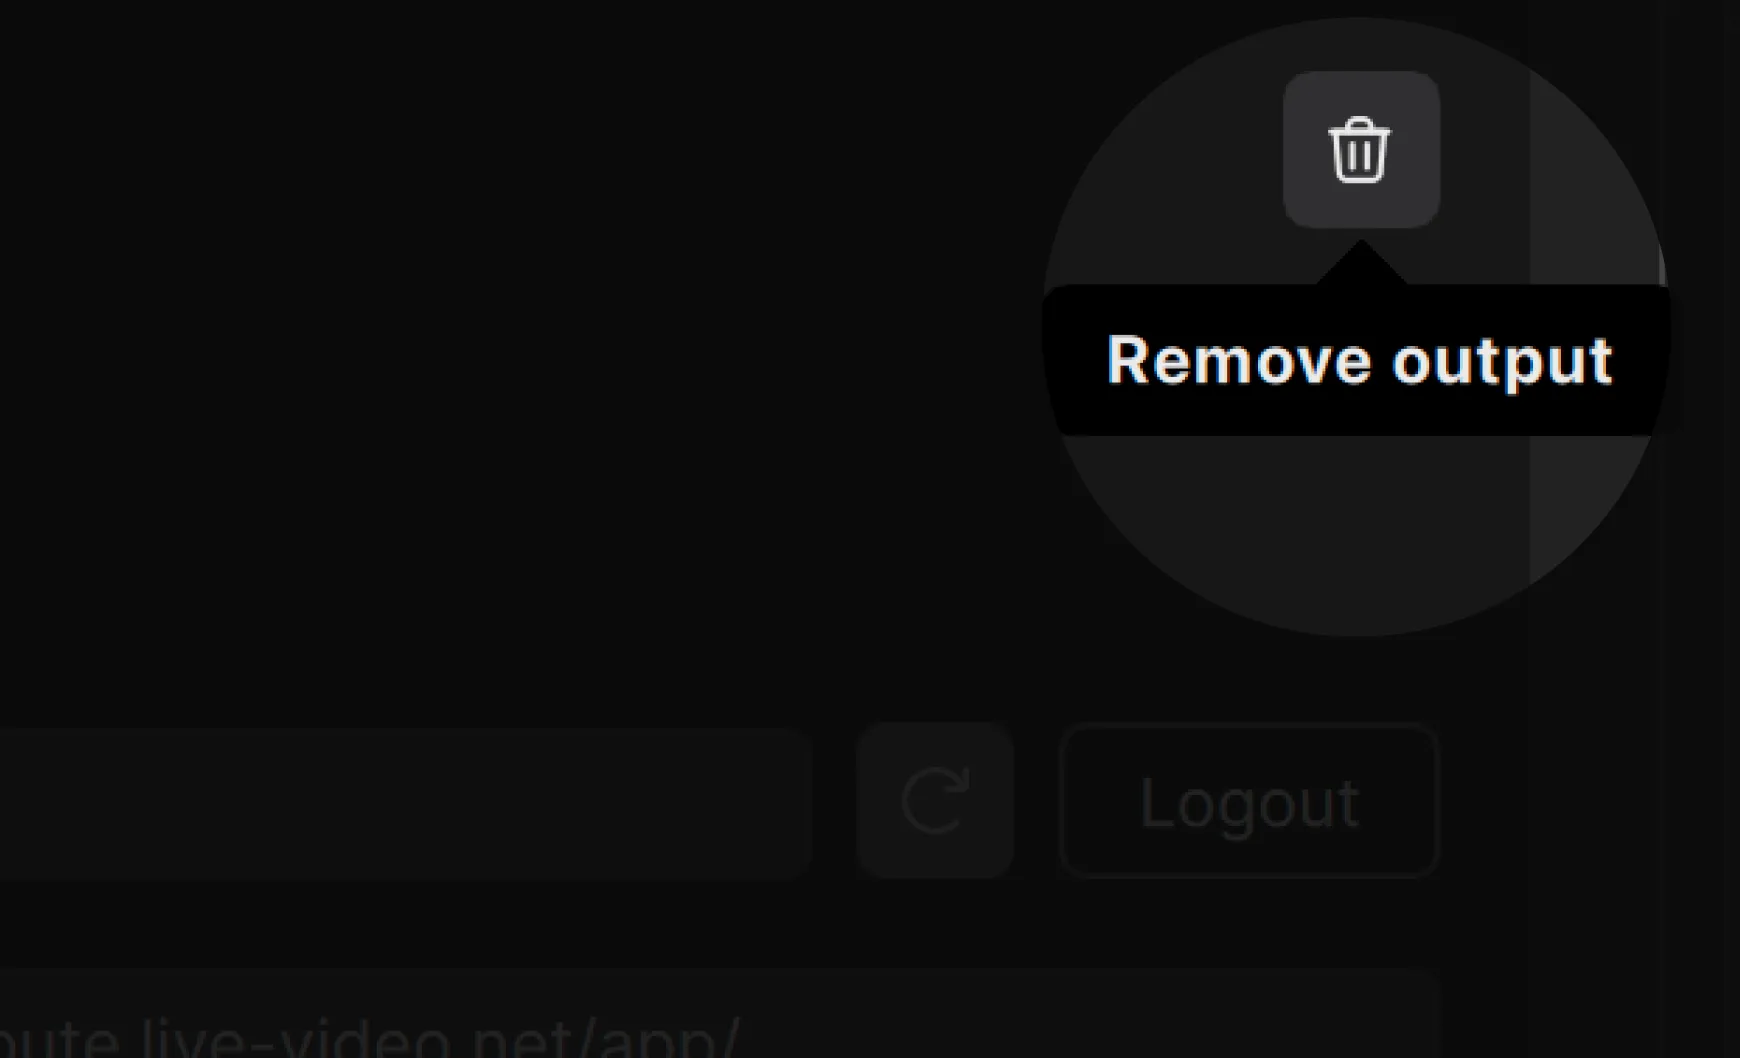
Removing Otputs
There are two ways to remove a stream output.
You can remove it by clicking the trash bin icon next to the output list item in Stream settings.
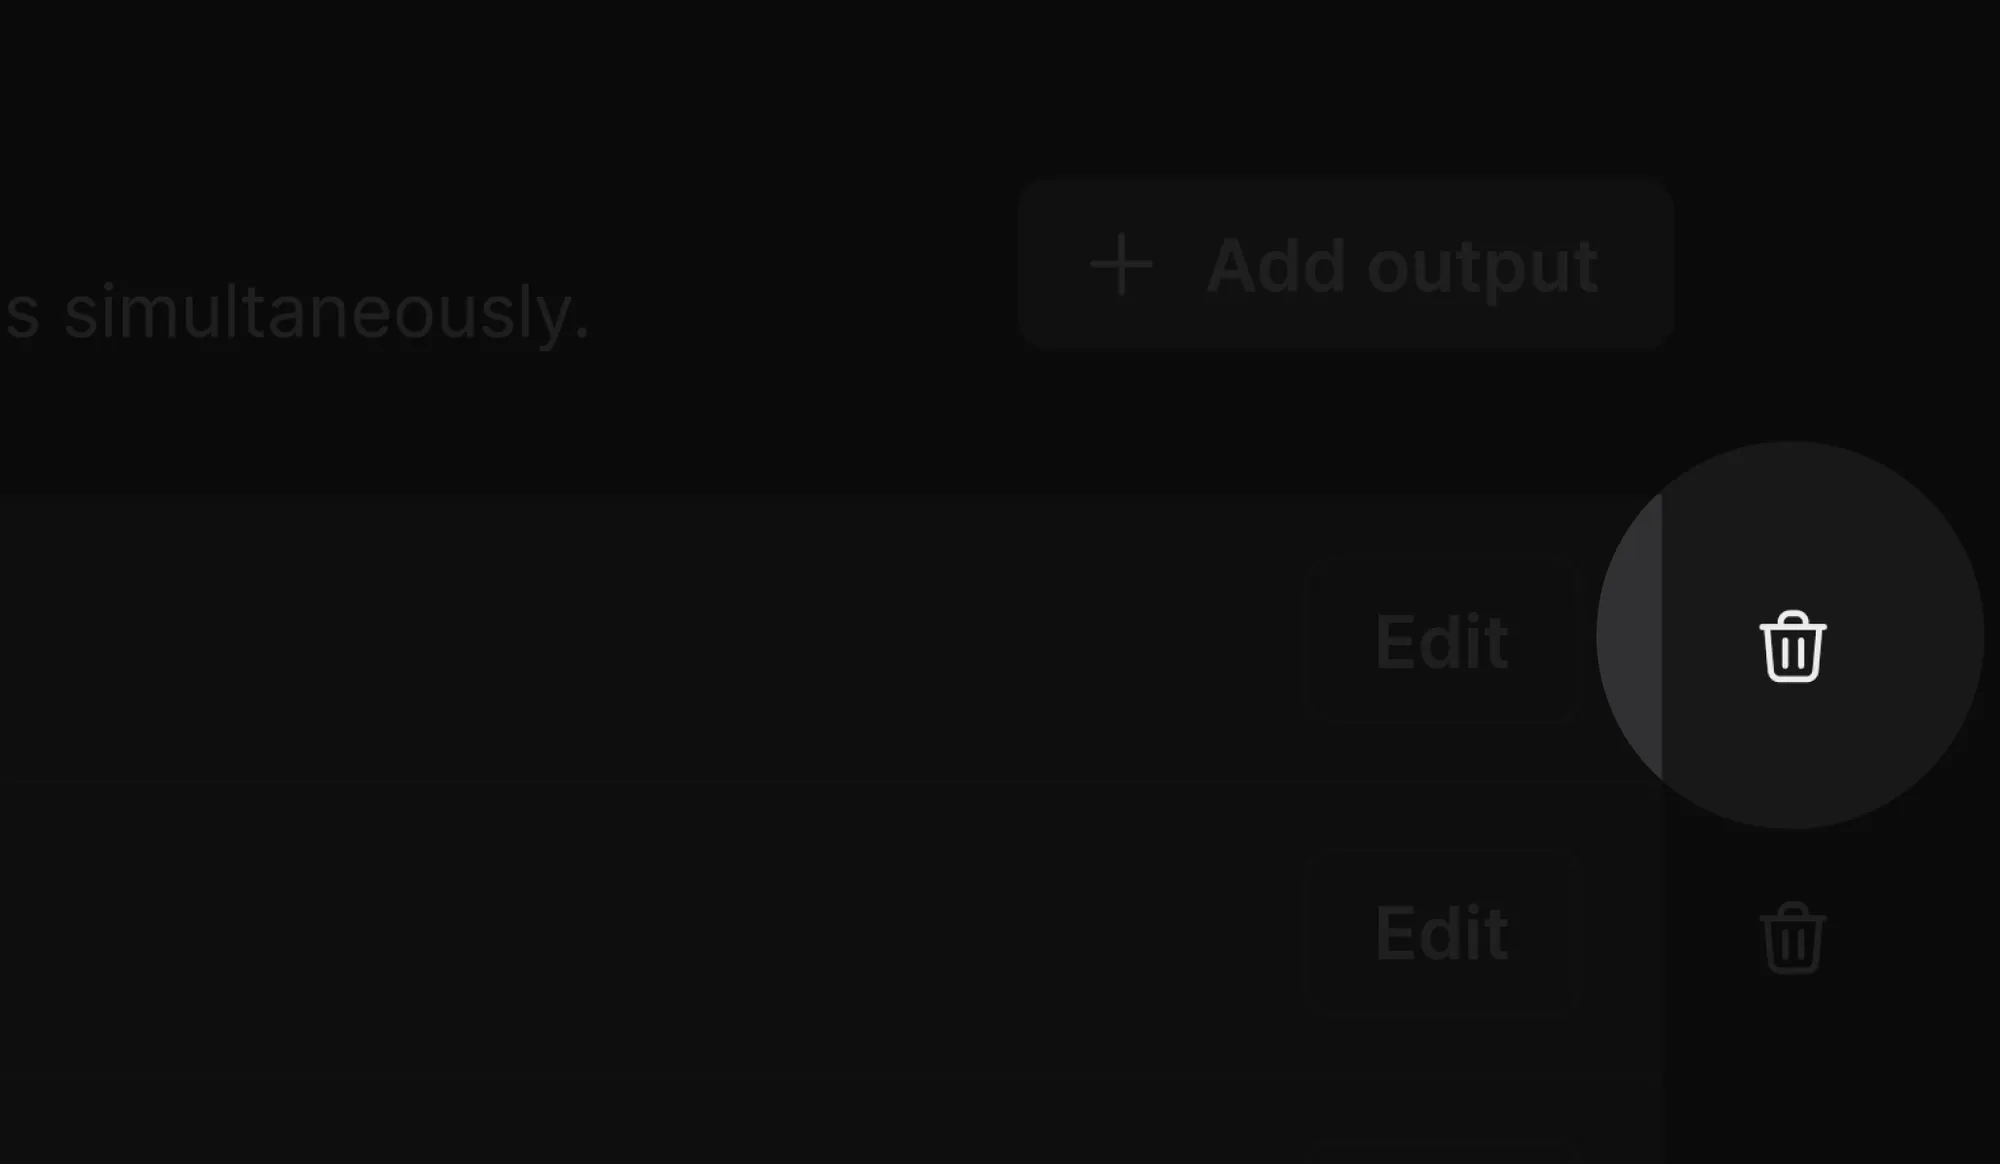
Or you can remove it by clicking the trash bin icon placed at the top-right corner of the Stream information in the detailed output settings view.
Encoder Settings
The Encoder settings in Meld Studio are the core configuration options that impact the quality and performance of your streams and recordings.
Main Canvas
The Main Canvas defines the base resolution for your primary, horizontal content. You can choose from several landscape resolutions based on your production needs or streaming requirements.
Supported Resolutions (Main Canvas)
- 4K UHD
- 1440p
- 1080p (Default)
- 864p
- 720p
- Portrait 4K
- Portrait 1080p
- Portrait 720p
Set the Main Canvas Resolution
- Navigate to Preferences → General.
- Choose the Main Canvas resolution using the Canvas dropdown menu.
Vertical Canvas
The Vertical Canvas is automatically enabled when Multi Canvas is active.
Framerate
Framerate refers to the frequency at which frames are captured/displayed consecutively. Meld supports streaming/recording framerates of 30fps or 60fps.
Configure The Framerate
- Navigate to
Preferences → General. - Choose the Framerate using the dropdown menu.
Video Bitrate
Video bitrate represents the amount of data processed per second to determine the quality of your video stream or recording. A higher bitrate ensures smoother playback and better video detail, while a lower bitrate may lead to pixelation or visual artifacts.
Set The Video Bitrate
- Navigate to
Preferences → General. - Edit the Video Bitrate field.
Multi Canvas Bitrate (When Enabled)
When Multi Canvas is active, bitrate fields appear separately for the Main Canvas and Vertical Canvas.

Platforms Video Bitrate
- Twitch: Twitch supports a bitrate of 3,000kbps to 6,000kbps.
- YouTube: YouTube supports a bitrate of 3,000kbps to 40,000kbps.
- Kick: Kick supports a bitrate of 1,000kbps to 8,000kbps.
- Facebook: Facebook supports a bitrate of 600kbps to 15,000kbps.
Audio Bitrate
Audio bitrate measures the amount of data used to transmit audio per second. Higher bitrates result in clearer, more detailed sound.
Check out the platform's recommendations for Audio Bitrate to ensure compatibility and avoid unnecessary strain on your setup.
Hardware Encoder
When hardware encoding is disabled, Meld Studio defaults to using x264.
Windows
Meld Studio automatically detects and utilizes NVENC (NVIDIA Video Encoder) when Hardware Encoding is enabled, and a compatible NVIDIA GPU is available.
💡 NVENC provides high-performance encoding with minimal impact on system resources.
macOS
Meld Studio leverages platform-specific hardware encoders based on your device. This includes Apple Silicon (M1/M2), Intel Quick Sync Video (QSV), or AMD hardware encoders.
Encoder View
The Encoder View provides a real-time visual overview of how content flows through Meld—from canvases and audio sources, through encoders, and out to each output destination.
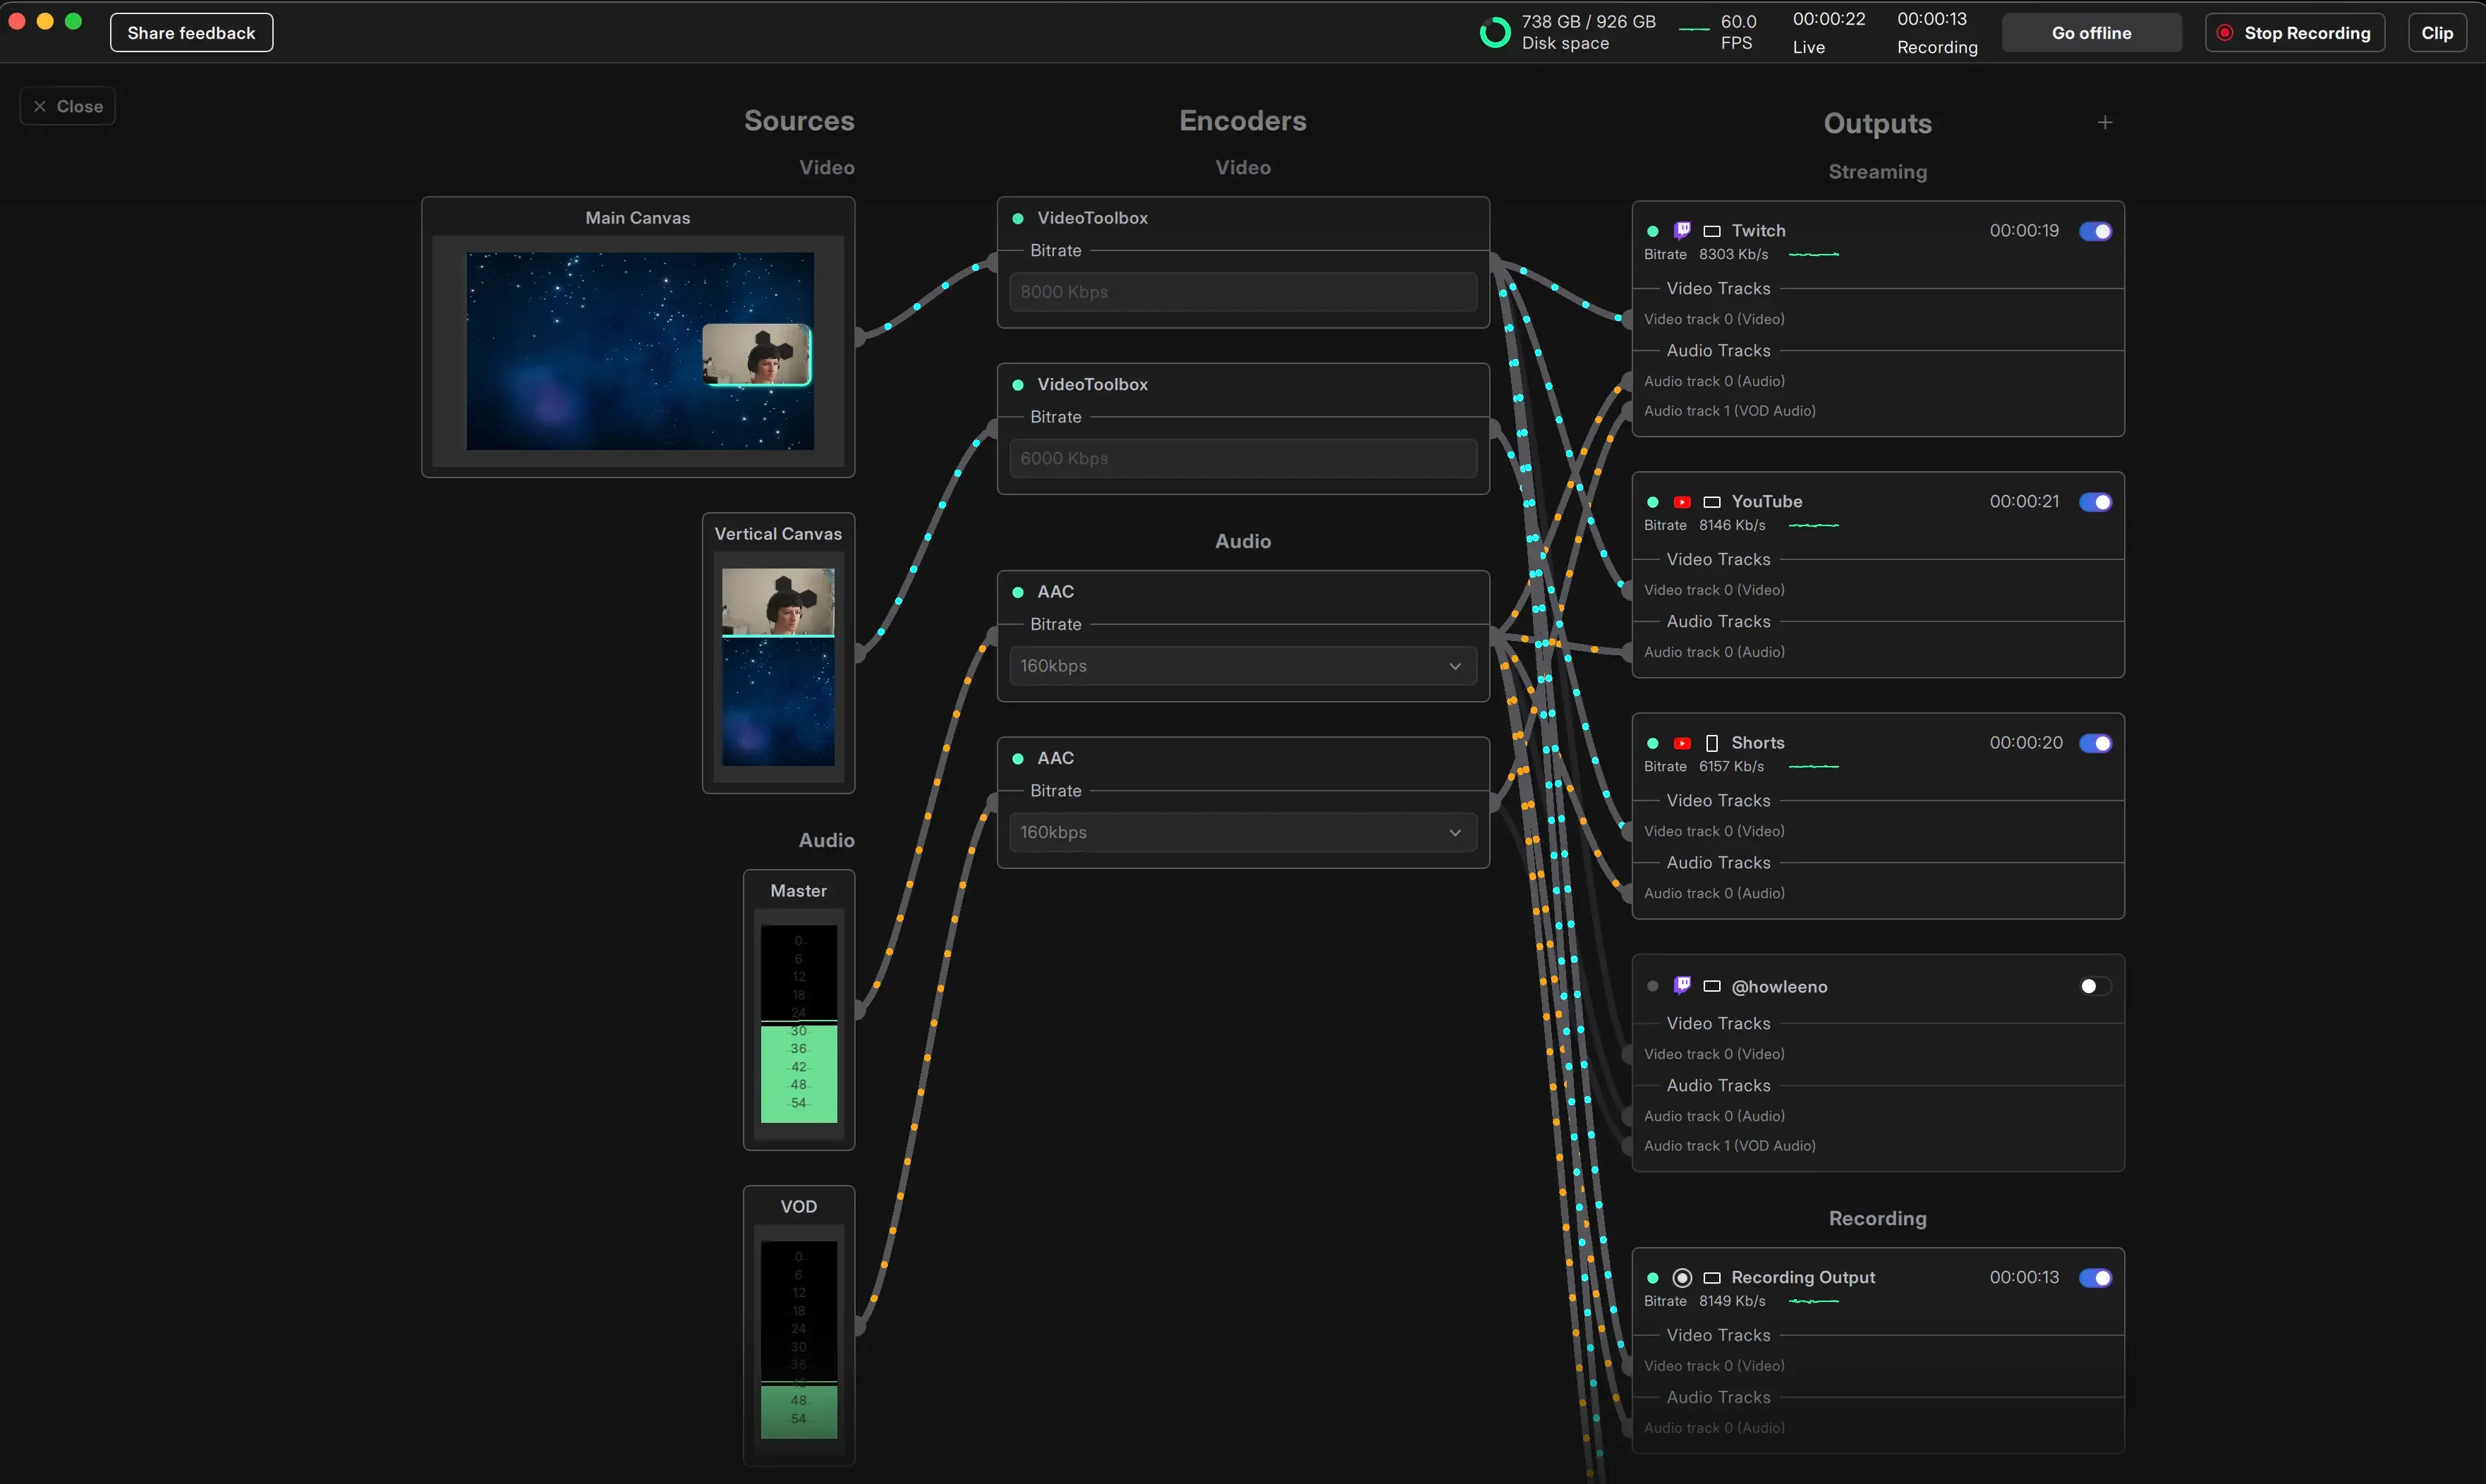
The view is split into three columns:
- Sources (left): includes your Canvases, plus your Master and VOD audio sources.
- Encoders (center): shows the encoding pipeline for both video and audio.
- Outputs (right): displays all your active outputs (e.g. Twitch, YouTube, Recording, Clipping) with their associated audio and video tracks.
Each connection line represents a path, either video or audio, showing exactly what’s being routed where.
Access Encoder View
- Navigate to the View menu.
- Select the Encoder View option to open the view.
Press Escape, or click the Close button on the left to leave the Encoder View.
Go live
After stream output and encoder settings are all set, you can start streaming anytime.
Starting The stream
- Navigate to the Outputs panel.
- Ensure that the output listed in the panel is enabled.
- Click Go live.
Failed To Connect
When an output fails to connect while going live, it will display a few actionable options:

- Warning icon: Hover over the warning icon to view the error message. Click the icon to access the stream information in settings.
- Cancel: This action resets the output to its offline state, allowing you to reconfigure or attempt to go live later.
- Retry: Selecting retry will attempt to reconnect the output and go live again.
Common Causes of Errors When Going Live
Network Issues
Although Meld Studio is designed to handle challenging network conditions, network issues can still cause errors when going live.
Missing Output Information
Errors can also occur if essential stream output details are missing or incorrect. This includes leaving fields like the Stream Server URL or Stream Key empty, or entering invalid information.
Incorrect Stream URL or Stream Key
The stream key entered in the Stream Key field is invalid or doesn't match the one provided by the streaming platform. Double-check your stream key to ensure accuracy.
{stream-key} in the Stream Server URL
Pasting the {stream-key} portion of the URL into the Stream Server field may result in an error. Ensure you copy only the Stream Server URL, excluding the {stream-key} part.

Tips For Resolving Errors
- Double-check all stream information fields for accuracy.
- Ensure your internet connection is good to go.
- Verify the status of your streaming platform for outages or restrictions.
- Use the Warning Icon in Meld Studio to view specific error messages and troubleshoot accordingly.
Go Offline
Once you start streaming, the Go Live button changes to a Go Offline button.
End All Streams
- Click the Go Offline button to end all active streams and stop your broadcast on all connected platforms.
End Stream Individually
- If you prefer to stop streams individually, you can disable specific outputs using the toggles in the Outputs panel. The live state will remain active, so you can restart streaming on any platform when ready.
FAQ
Answers to common questions.
How do I go live from Meld Studio?
To start streaming with Meld:
- Set up your stream output by navigating to Preferences → General → Stream Settings.
- Add a stream output destination.
- Make sure encoder settings a good to go.
- Click the Go Live button in the top-right corner of the main viewport to begin streaming.
Is it possible to broadcast to multiple platforms at once using Meld Studio?
Yes, Meld Studio supports multistreaming. You can add multiple outputs in the Stream settings and go live on platforms like Twitch, YouTube, Facebook, and more, all at the same time.
Can I disabled Multi Canvas and not lose my Vertical layouts?
Yes. Meld will preserve your Vertical layouts whenever you disabled Multi Canvas.
Can I adjust my encoder settings while live?
No, encoder settings cannot be adjusted once you are live. To make changes to your encoder settings, you'll need to stop the broadcast, update the settings, and then start streaming again.
Can I stream to Kick, and Facebook?
Yes! Simply enter the Stream URL and Stream Key into the appropriate fields in the Outputs settings of Meld Studio.
Can I add more than one Twitch output?
Yes! You can add multiple
How do I monitor my stream health?
You can monitor your stream performance via the Outputs Panel in the top-right corner of the UI, under the output name when you're live. Or at the top within the Stats bar.
Can I do vertical streams?
Yes, Meld Studio supports Multi Canvas, for Horizontal and Vertical content creation at the same time.
How does Meld Studio handle disconnections during a live stream?
Meld Studio attempts to reconnect automatically. If all the reconnection attempts fail, you'll get a message dialog to check your network connection and try to go live again.